Moats and castles belong in the past
We are living in an important moment in the IT world. The well-known perimeter defense approach is continuing to show its age and its effectiveness in favor of a Zero Trust approach. In a nutshell, the Zero Trust model literally breaks the traditional concept of security in which companies are “castles” protected with “moats.”
ATAWAD
Nowadays, companies’ workforces have the chance to be more and more flexible by working remotely, selecting their devices and most of all, using increasingly cloud-based resources. It is clear the way people work has changed forever. Organizations have to embrace this new way of working, frequently summed up by the concept of ATAWAD: anytime, anywhere, any device. This can also be extended to ATAWADAC with the addition of “any content.”
Modern management
As a result, companies need to change or adapt by moving to cloud-based modern management. Let’s take the example of Windows 10 devices:
A legacy approach was to deploy:
- Configuration or restriction policies by GPO from an on-premises service (like GPMC)
- Windows patches and updates from an on-premises update service (like WSUS)
- Applications from an on-premises software service (like SCCM).
The main restriction here is that devices need to be able to contact all these services while being on the company’s internal network.
On the contrary, modern management allows administrators to deploy over-the-air:
- Policies using CSP
- Windows patches with Windows Update as a Service, also known as Windows Update for Business (WUfB)
- Applications directly from your SaaS device management console (such as with Workspace ONE)
From GPO to CSP: the "Sleep" button example
First of all, let’s take a simple policy example that enables us to describe what is going on technically under the hood.
As an administrator, I would like to set a policy from Workspace ONE unified endpoint management (UEM) to personalize the Windows Start menu of my targeted Windows 10 device by hiding the “sleep” button.
Here is a screenshot of the default Windows Start menu before applying the policy:
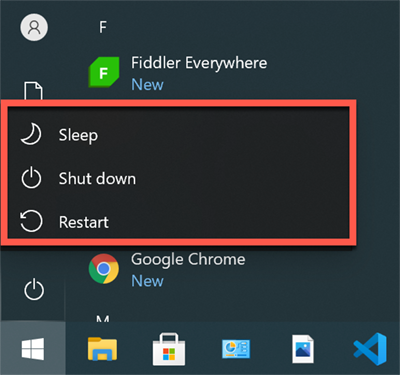 Default Windows Start menu
Here is the expected result after applying the policy:
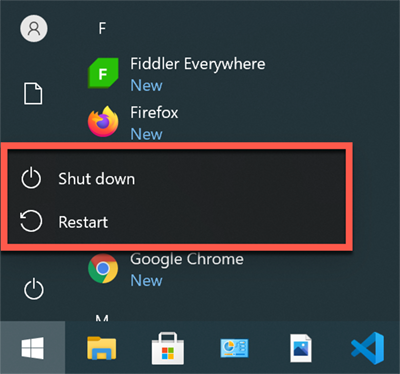
Windows Start menu once policy is applied
To apply this policy:
- Log in to the Workspace ONE UEM Console as an administrator.
- Under DEVICES > Profiles & Resources > Profiles click ADD, then Add Profile.
- For Platform, select
- For Device, select Windows Desktop.
- For Context, select Device Profile.
- Into the General Payload, add W10_PERSONALIZATION as the name of the profile and add a Smart Group.
- Into the Personalization Payload, select HIDE next to the Sleep description:
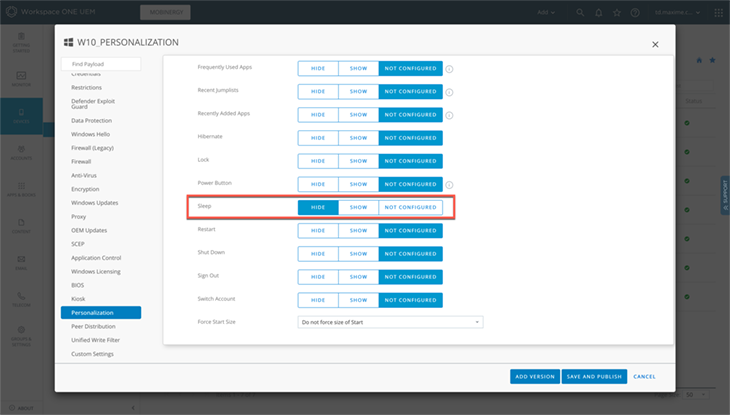 Personalization setting
- Finally, click SAVE AND PUBLISH.
We now have a ready-to-use profile with the expected policy described above.
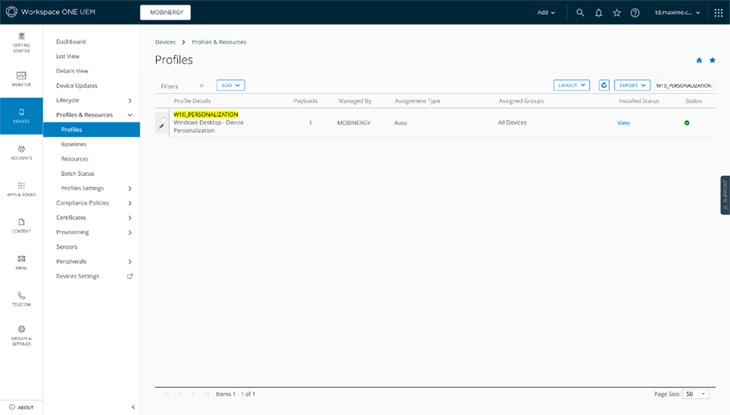
OMA-DM protocol
Once the W10_PERSONALIZATION profile is published, Workspace ONE UEM has to communicate with the targeted Windows 10 device to apply its policy. Hence, we first have to understand how Workspace ONE UEM console is able to communicate with Windows 10 devices.
Windows 10 devices are using management clients to communicate to the Workspace ONE UEM console on behalf of the device. There are two primary management clients:
- OMA-DM (Open Mobile Alliance Device Management)
- Workspace ONE Intelligent Hub
If each management client serves its own and distinct purpose, OMA-DM client is the only one to handle Microsoft CSPs (similar to GPO but in a modern way):
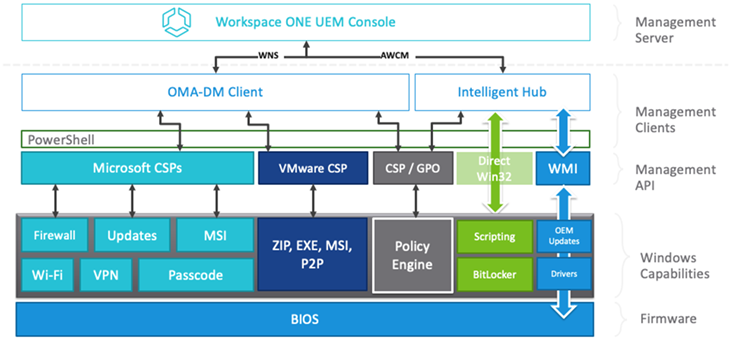 Workspace ONE UEM solution stack (source)
We now have the first main pillar of our Windows 10 modern management journey: OMA-DM protocol, a secure protocol that runs on HTTPS-based communication between a DM server (Workspace ONE UEM) and a DM client (located on the Windows 10 OS).

OMA-DM stack overview: protocol
OMA-DM session
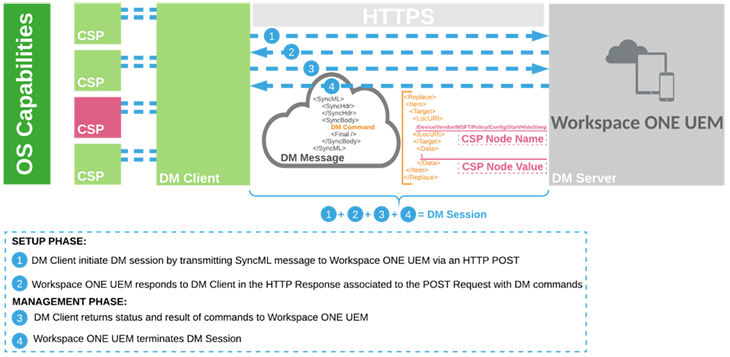
The OMA-DM protocol is a client-initiated remote HTTPS DM session over SSL. To illustrate the DM session generated for our policy example, we can use several tools like:
- Fiddler Everywhere described as a free web debugging proxy capturing all HTTP(S) traffic between the computer and the internet.
- SyncMLViewer showing in real time all information based on OMA-DM protocol exchanged between the Windows 10 device and the management system (here, Workspace ONE UEM)
As SyncMLViewer is specifically dedicated to DM session inspection, I have chosen to use this tool throughout the rest of this example.
So, after installing SyncMLViewer into my Windows 10 Device, here is the DM session logged when Workspace ONE UEM pushes the W10_PERSONALIZATION profile into the Windows 10 device:
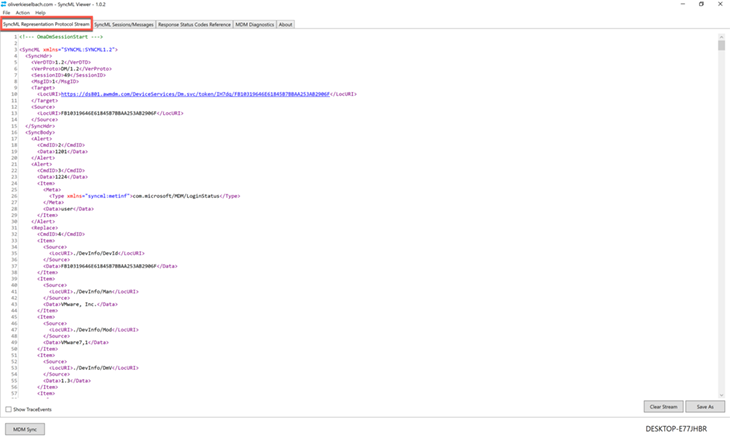
SyncMLViewer: DM session overview
Without going into details for the moment, it seems that this DM session consists of a series of 4 XML-based commands blocks, with both blocks delimited by SyncML Tags.
We now have the second main pillar of our Windows 10 modern management journey: OMA-DM session consisting of a series of commands exchanged between a DM server (Workspace ONE UEM) and a DM client (Windows 10 device).

OMA-DM messages
As seen above, the DM session consists of a series of commands exchanged between Workspace ONE UEM and the Windows 10 Device.
From the SyncMLViewer tool, we are now clicking the SyncML Sessions/Messages tab to have a better understanding of what a DM session is made of. We can find on the left column:
- A block listing all DM session recorded.
- A block listing all DM messages for a specific DM session. These DM messages were called "commands" previously. We can validate that the current DM session consists of four DM messages.
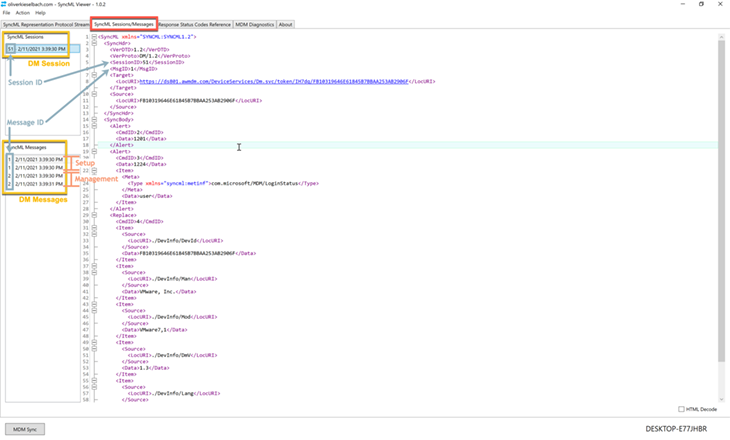 SyncMLViewer: DM session and DM message detail
Some comments here:
- To link all DM messages belonging to the same DM session, each DM message has a specific XML element session ID: SessionID.
- This session ID is the same for each DM message. According to the above screenshot, its value is 51.
- Each pair of Request/Response DM messages is identified by a specific XML element message ID: MsgID.
- Here we have two pairs of DM messages, the first one with a MsgID equal to 1 as seen in the above screenshot. The second one has a MsgID equal to 2.
A DM session can be divided into two phases:
- Setup phase: This phase matches with the first pair of Request/Response DM messages with the MsgID equal to 1. The Windows 10 device sends an initiating message to Workspace ONE UEM. The Windows 10 device and Workspace ONE UEM exchange needed device information.
- Management phase: This phase matches with the last two DM messages with the MsgID equal to 2. Workspace ONE UEM is in control. It sends management commands to the Windows 10 device and the Windows 10 device responds. Phase two ends when Workspace ONE UEM stops sending commands and terminates the session.
Hence, when pushing the W10_PERSONALIZATION profile to the Windows 10 targeted device:
- A DM session with a specific session ID is created.
- The DM session is generally made of two pairs of Request/Response DM messages (called one-step protocol), each identified by a message ID.
- Each DM message is an XML-Based SyncML (Synchronization Markup Language) document.
Here is the generic structure of a SyncML message:
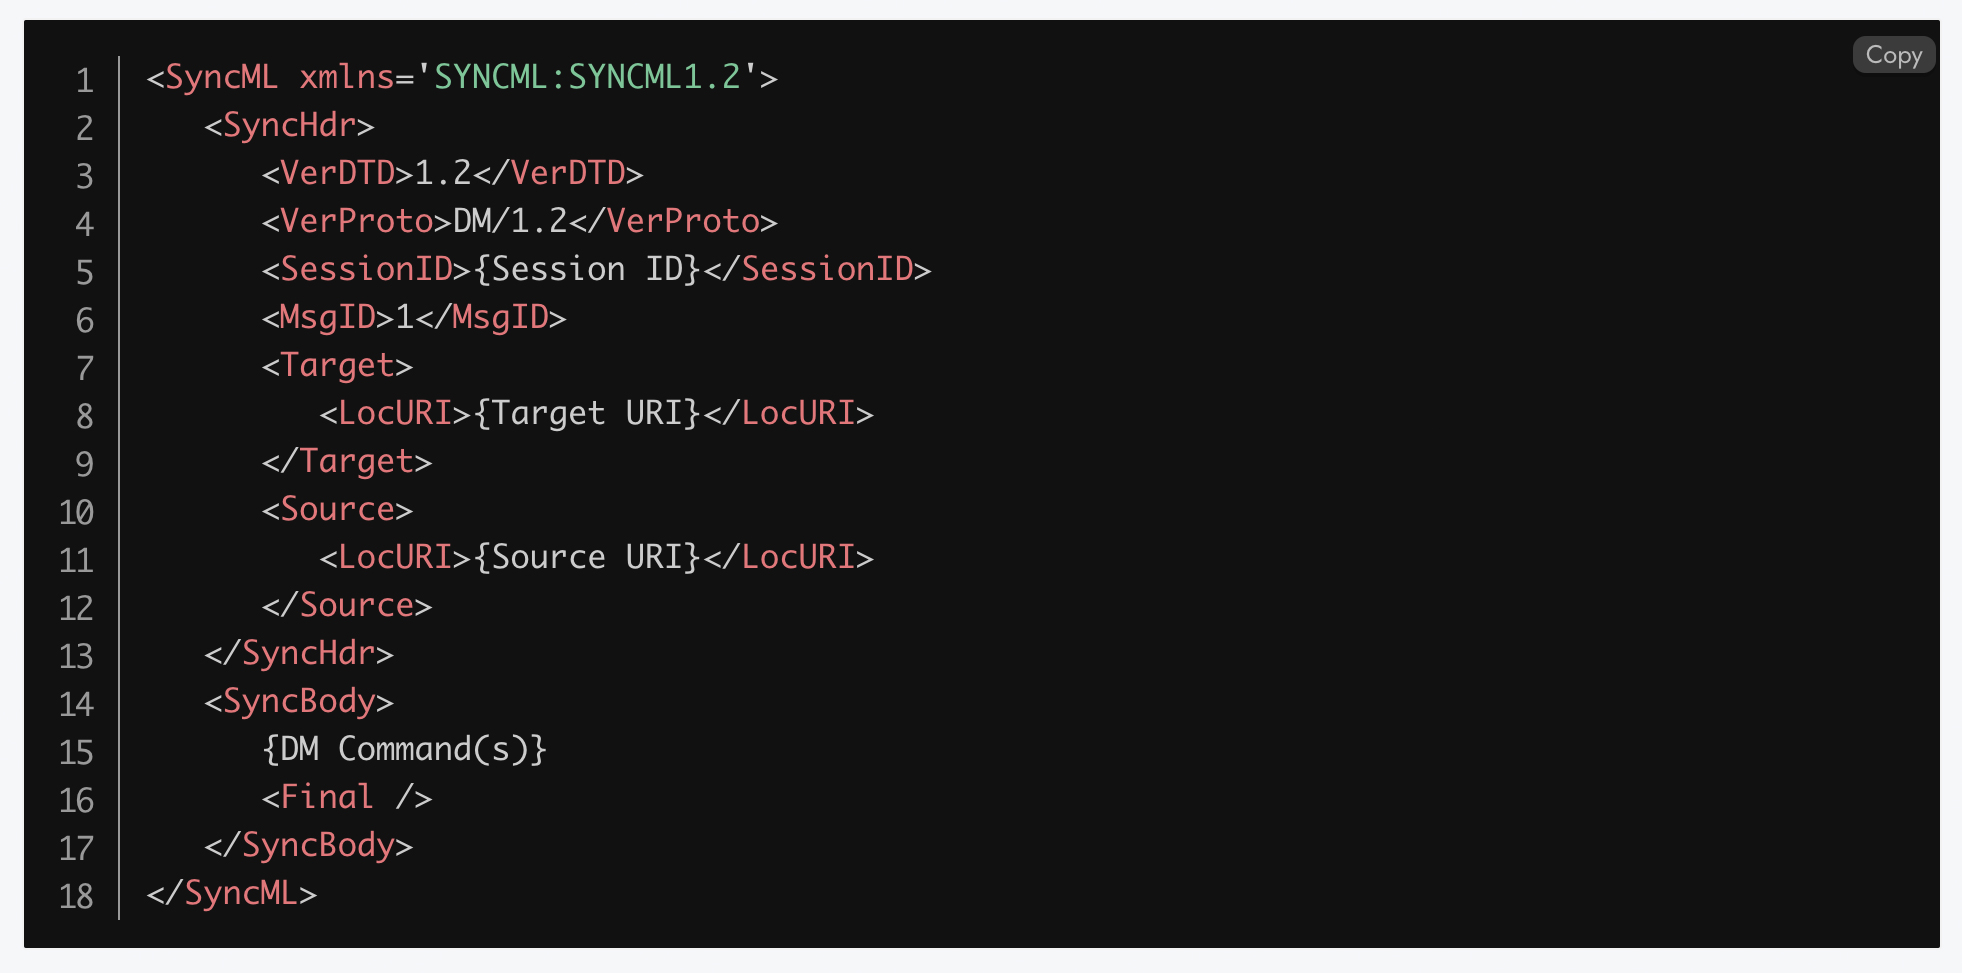
- A SyncML message has two child elements.
- The SyncHdr element serves as the container for the revisioning routing information in the DM message.
- The SyncBody element type serves as the container for the contents of the DM message.
SyncHdr element detail
The SyncHdr element can be seen as the header element into an HTML page. Looking into the SyncHdr element, we MUST find:
- The Session ID to indicate the ID of the current DM session.
- The Message ID to indicate the ID of the current DM message.
- The Message target Uniform Resource Identifiers (URI).
- The Message Source URI.
Here is a SyncHdr focus example coming from a DM message in our example:

Additional comments:
- We may wonder where the value FB10319646E61845B7BBAA253AB2906F comes from.
This value, FB10319646E61845B7BBAA253AB2906F, refers to the DeviceClientId on the Registry located under HKEY_LOCAL_MACHINE\SOFTWARE\Microsoft\Provisioning\OMADM\MDMDeviceID:

- Here is the UDID on the Workspace ONE UEM console when displaying in the device detail view:
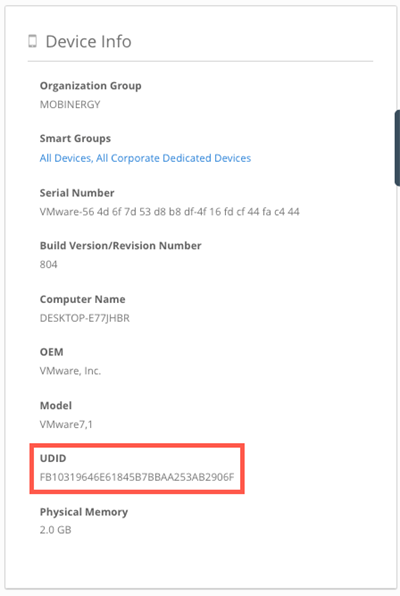
Device detail view in Workspace ONE UEM
- We also may wonder how the Windows 10 device knows when to initiate a DM session. The DM client (located on the Windows 10 device) supports the ability to configure a push-initiated DM session. Using the Windows Notification Services (WNS), Workspace ONE UEM can request the Windows 10 device to establish a DM session with Workspace ONE UEM through a push notification. During enrollment, the Windows 10 device registers a persistent connection with the WNS cloud. We can retrieve WNS information directly in the Workspace ONE UEM console in the device detail view:
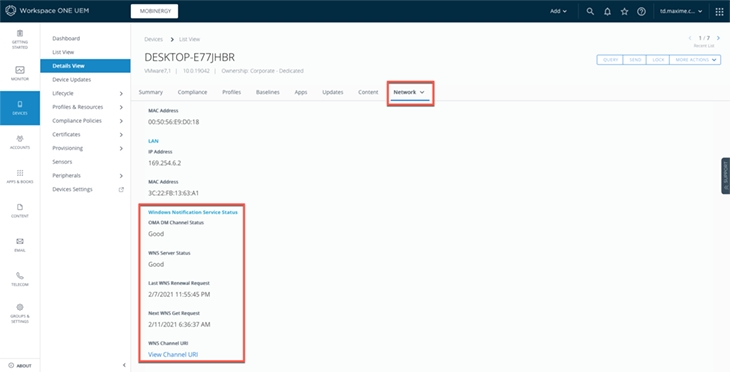
SyncBody element detail
The SyncBody element can be seen as the body element in an HTML page. We now have the third main pillar of our Windows 10 modern management journey: OMA-DM messages, an XML-based SyncML document.
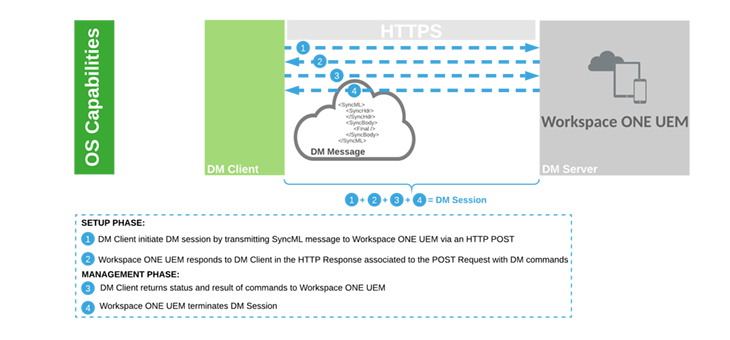
OMA-DM stack: protocol + session + message overview
OMA-DM command
The SyncBody element contains DM commands or, in other words, settings to apply to the Windows 10 device. These settings are all exposed or expressed via configuration service providers (CSPs).
A CSP, represented in a conceptual tree, is an interface structure to read, set, modify, or delete configuration settings on the device. These settings map to registry keys or files. Furthermore, CSPs use SyncML DM messages as carriage payload and Workspace ONE UEM leverages CSPs when an administrator creates and assigns profiles in the console.
Let's go back to Workspace ONE UEM console:
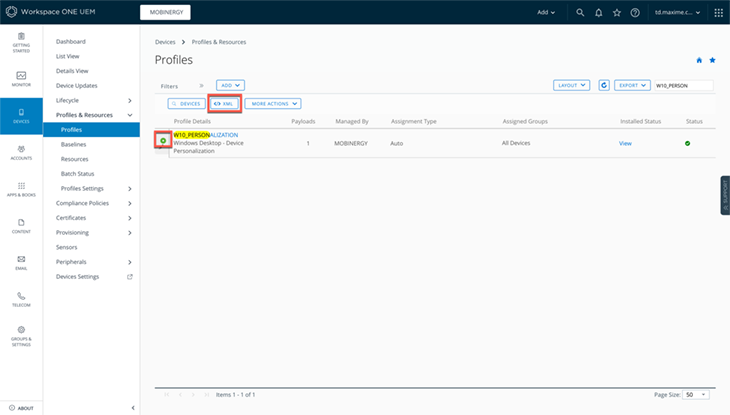
- Under DEVICES > Profiles & Resources > Profile, select the W10_PERSONALIZATION profile.
- Click the </> XML button.
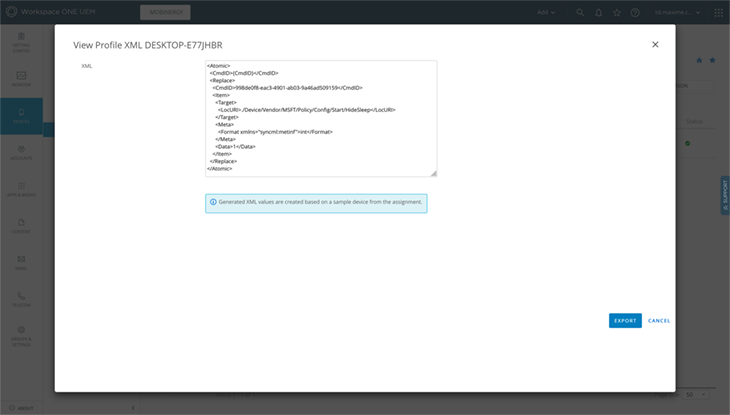
3. A modal window appears with the CSP embedded into a SyncML payload.
In general, the standard syntax is as follows:
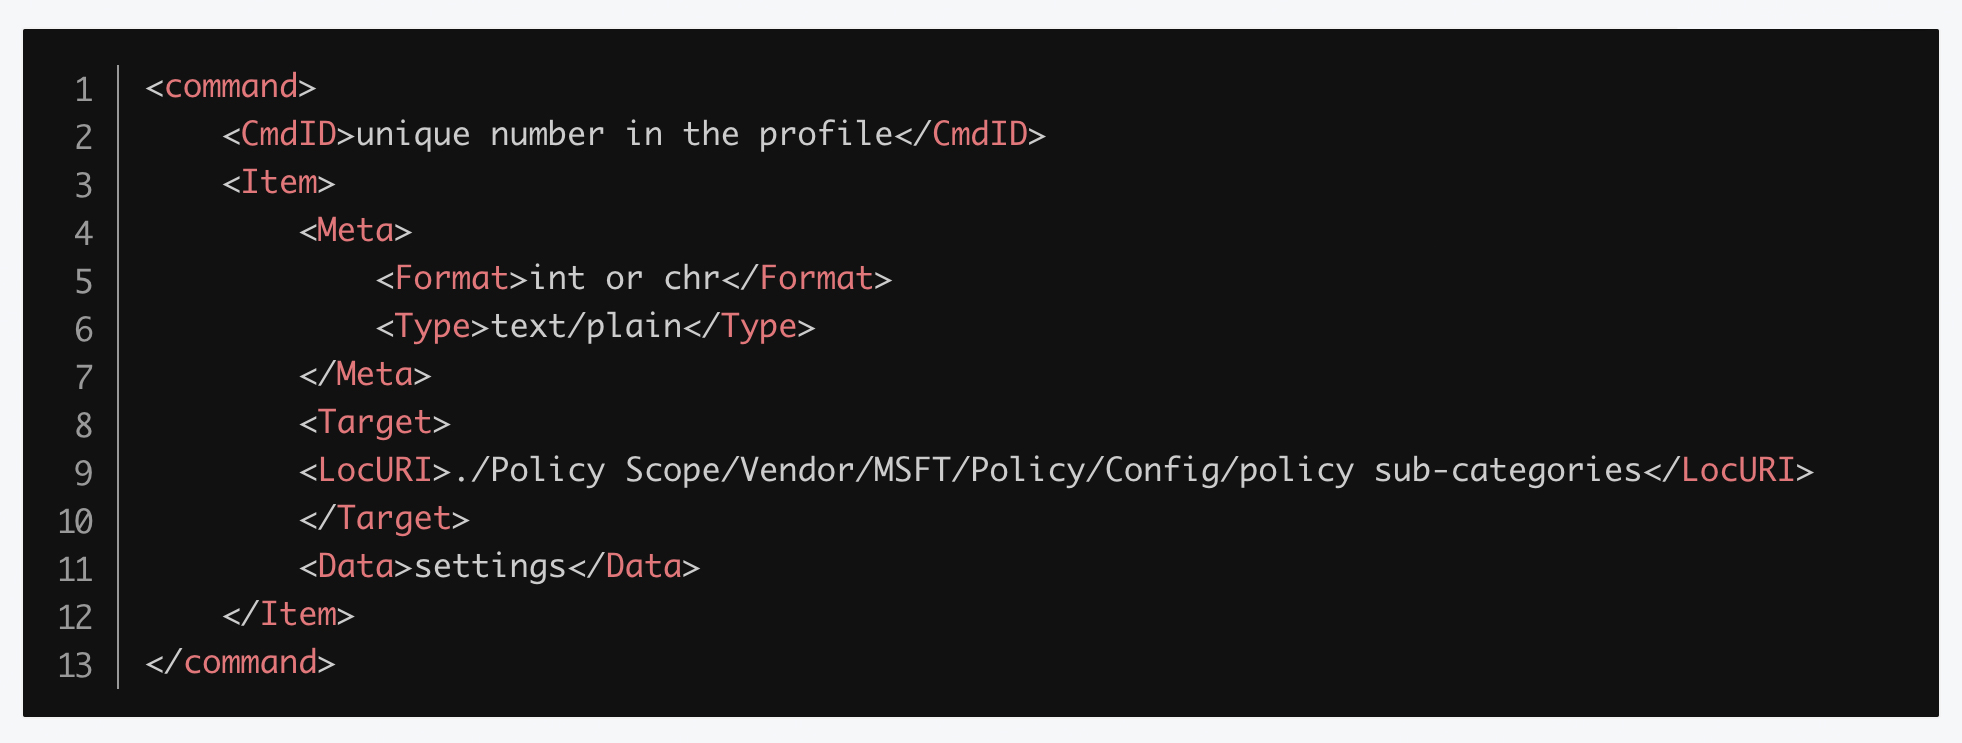
| OMA-DM Elements | Description |
| Command (Cmd) |
Supported values for the Custom Settings profile are:
|
| Unique number in the profile(CmdID) |
This is a unique number to identify each command in the profile. For example, we can use 1, 2, 3, etc. for each new command within a custom profile. The CmdID must be unique for each command in the same profile; however, it does not have to be unique across profiles. |
| Int or Chr(format) | This is either an integer (int) or a character (chr) based on the values specified (data) in the CSP policy. |
| /Policy Scope/ (LocURI) | Use either ./Device/ if policies are applied to the device, or ./User/ if policies are applied only under a user’s profile. |
| Policy sub-categories (LocURI) | Policy path |
|
Settings (data) |
Uses a valid value defined from the CSP or in the ADMX file. |
As we can see, the CSP used is Start/HideSleep. Here is its definition from Microsoft:

4. On the SyncMLViewer side, we can find this XML code under the SyncBody element
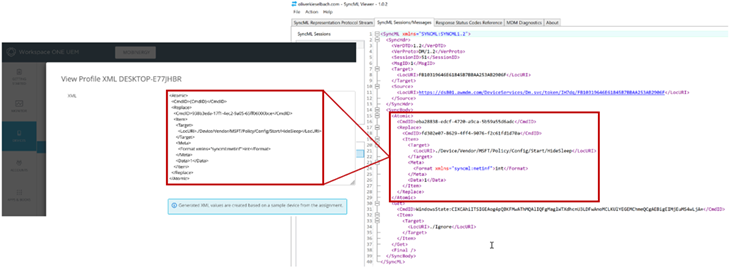
We now have the last main pillar of our Windows 10 modern management journey: DM command including CSPs.
Conclusion
We saw in this blog post that OMA-DM policies support not only standard Microsoft CSP, but also:
- Inbox ADMX-backed policies: These are OS group policies that are included and located in the C:\Windows\PolicyDefinitions folder.
- Application or third-party ADMX policies: These are third-party application settings defined in the ADMX. The ADMX will need to be downloaded and ingested into devices.
Learn more about how Unisys can help you manage and secure all enterprise devices with Modern Device Management.

